|
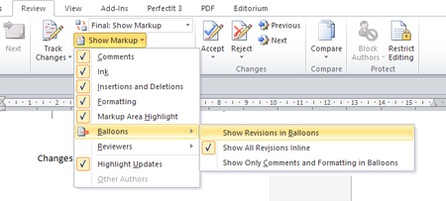
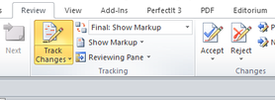
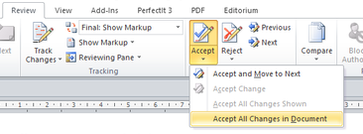
For many of my clients it is the first time they have hired an editor to have their writing proofread or copy-edited. Often they have never used or even heard of the Tracked Changes function in Word. The Tracked Changes function is an editor’s best friend, but many people get a surprise when they get their document back with red and blue lines through it and are not sure what to do next. If you are one of these people, this is for you. What is Tracked Changes? Tracked Changes is the way a Word document keeps a visible track on any changes that are made to a document. It makes it easy when sharing a document to quickly check for any changes. The person receiving the edited document can then go through and accept or reject all the changes until the document has no more coloured marks, and is (hopefully) an improved version of the original. Why Tracked Changes? Most editors use the Tracked Changes function when proofreading or copy-editing a document online as it shows exactly any changes that are made, and allows for comments or queries to be made to the author in the exact place in the text – no more shuffling between a list of comments and the document. I love Tracked Changes as it gives the author the feeling that they are still in control of their own writing, and it holds everyone accountable. Ultimately it is up to the author to decide whether to accept or reject the change (though they would be wise to check first before they reject!). It is also a lot less cluttered and messy than the old pen and paper method. What Tracked Changes looks like The different versions of Word will be slightly different, but similar enough to be able work it out. Below are the instructions for Word 2010. The buttons for Tracked Changes can be found on the Review tab which is along the ribbon at the top of the Word screen. Changes Changes can be shown within the text or in balloons out the right side, depending on your preference. A black line appears on the left of a line with a change which helps to alert for small changes such as punctuation. You can change the settings from 'inline' to balloons by clicking on the Review tab, selecting Balloons and then selecting your preference, as shown below. In the balloons setting, if there are too many balloons to fit on the screen, the Reviewing Pane will appear on the left with a list of all the changes and comments. These can be edited or deleted as with balloons. Comments Any comments or queries from your editor will also be in either balloons on the right side or ‘inline’ with the text, depending on your settings. If you prefer the tracked changes inline, it may be clearer to at least show comments in balloons by selecting the Show only Comments and Formatting in Balloons. To access the comments which are ‘inline’ with the text, hover your mouse over the words highlighted to show its contents. Different reviewers/authors You can see who has made a change or a comment by the initials used in the comment depending on your settings. My initials are ‘CL’ for Clearlingo. You may have several reviewers making changes or comments in one document and wish to see the changes from only one reviewer at a time. On the Review tab, select Show Markup, then Reviewers. You can then select which reviewer’s changes you wish to see. How to use Tracked Changes If you are going to address the changes from your editor and also make changes yourself to send back to your editor for review, make sure you turn Tracked Changes on before you do anything. This makes it easier for your editor to find the new changes you have made. Your changes should automatically show in a different colour from those of your editor. If you are not going to send the document back to your editor, but wish to handle all the suggestions yourself, you do not need to turn Tracked Changes on, though you may wish to for your own benefit. How to turn Tracked Changes on and off On the Review tab, click on the Track Changes button. The button should now be highlighted. Click it again to turn it off. How to remove a tracked change The only way to permanently remove a tracked change mark is to accept or delete it. To accept or delete a tracked change, right-click on the change within the text or the balloon, and select Accept Deletion or Reject Deletion, or Accept Insertion or Reject Insertion. The options depend on the type of change. To go through the document systematically, place the cursor at the start of the document, and select Next on the Review tab in the Changes section. This finds the next change. Once you have reviewed the change, select Accept or Reject. Accept makes the change, and Reject returns the text to the original. Click Next to find the next change until you reach the end of the document. Note: If the change involves a substitution, you will need to accept the deletion and then the insertion. Accept All/Reject All In some cases you may wish to accept all the changes without reviewing them. Select Accept all Changes in Document from the drop-down menu under Accept. The same applies to Reject All under the Reject drop-down menu. This returns the document to its original form without remembering any changes. How to remove comments To remove comments once you have actioned any queries or instructions, right-click on the comment balloon (or the comment itself if inline) and select Delete Comment. Different views – how to hide the tracked changes In some situations you may wish to compare the document with the original version, or see what the final version would look like once the changes have been made. There are four options from the drop-down menu:
Final: Show Markup – This is the default view and shows what the final version would look like but with all the changes and comments showing. This is the most useful setting when going through changes. Final – This shows how the document would look if you accepted all changes. This is useful if all the changes are cluttering the text and you need a clean view. It does not delete the changes or comments. Original: Show Markup – This view shows the original text with the markup showing Original – This shows how the original looked before changes or comments were made. However, it does not delete the changes or comments. Note: Even though you may hide the changes and comments, if you do not accept or reject them, they are still embedded within the document. If you then share your document with someone else, they will be able to access the comments and changes (this has got a few people in trouble!). Footnotes and Captions When adding or deleting footnotes and captions, Word will not re-number until the changes are accepted or deleted. While Tracked Changes is on, the numbering will appear wrong. What next? If you have written a book and don't know what the next step is or this all sounds too overwhelming, I can help. I am a copy-editor and proofreader based in New Zealand. My business, Clearlingo Editing and Proofreading, caters to all writers of fiction and non-fiction books. For more information or enquiries for how I can help you make your book shine, please see my website: www.clearlingo.co.nz/contact I would love to hear from you.
Marja Stack | Clearlingo
11/7/2017 02:44:26 pm
Thank you! I'm glad you found it useful. Comments are closed.
|
Hi, I'm Marja!You'll find all my advice about creating professional, Categories
All
Previous PostsPlain language
Business editing New Zealand English series The editing process General editing Technical |


