 Whether you are writing a novel, a business document or an academic paper, using Styles in your Microsoft Word document is the best and most time-efficient way to make a document look neat and consistent. The Styles 'codes' are applied to the various parts of the document for quick navigation and formatting. Using Word Styles means that all headings, text and spacing are consistent throughout the document, and any formatting change made on one page is automatically reflected in the rest of the document. The most exciting part at the end is making a table of contents with just a few clicks! Here are some basic, step-by-step instructions for adding Word Styles to your document. It can get a lot more complex, but this is a start which will make your document look tidier and more professional. What is a Word Style? A Word Style is a set of formatting instructions that is applied to text to make it look and act in a certain way. The font type, size and colour, the line spacing and the indents are all assigned to your text in a consistent code which is easily updated and reflected in the entire document. It means that you don’t have to manually format each part of your document, and saves a lot of clicks. Assigning Word Styles to different parts of the text (e.g. headings and paragraphs) ensures that each group of text is easily formatted with the same set of instructions. It also helps identify all the parts of your document and makes it easier to navigate and make a table of contents. How to assign a Style to match existing formatting If you have already written your manuscript and made beautiful headings, the easiest way to ensure they are all consistent is to assign the formatting from your heading to an existing Styles button. The Styles buttons are found on the Home tab at the top of a Word document. 
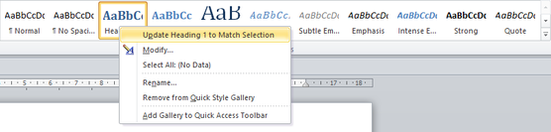 How to make all headings consistent Go through your entire document, placing the cursor within the text of each heading you wish make in the same style as your Heading 1 and click on the Heading 1 button. All Heading 1-level headings will now be formatted to look the same. Sub-headings Place the cursor in a first level 2 heading, right-click on the Heading 2 button and select Update Heading 2 to Match Selection to assign your heading style to the Heading 2 button. Repeat for level 3 headings, and so on. Other parts of the document You can also assign a separate Style to the title, sub titles, block quotes, lists, and more. To see all the options, click the small arrow at the bottom right of the Styles box. The main body of the text is automatically assigned to Normal. How to change the formatting of an existing Style If you have not yet written the document but know the formatting you require, or you have already assigned Styles but have decided to change the existing formatting of a heading, you can do this with just a few clicks and it automatically reflects in the entire document. 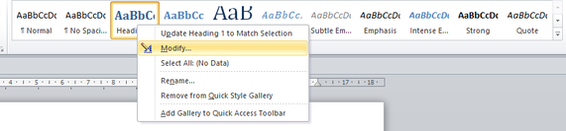
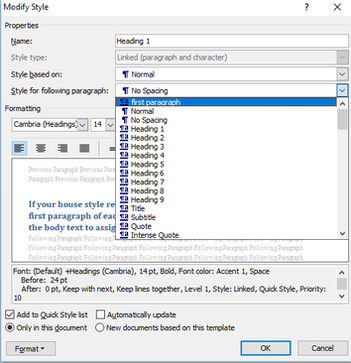
For more options, in the Modify Style dialogue box click on the Format button in the bottom-left corner of the dialogue box. 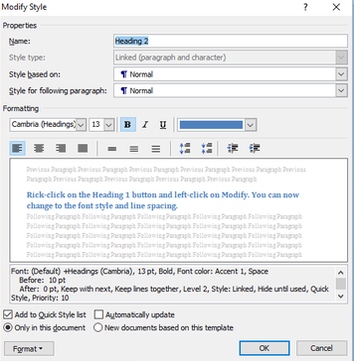 The Paragraph option allows you to set the spacing before and after each line. This ensures all spacing is consistent before and after each heading or paragraph. The Tabs option allows you to set tab stop positions. Note: This is not for first line indents – see below. 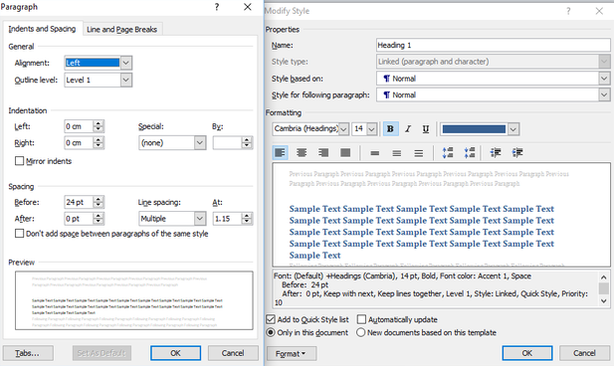 Normal text The main body text should automatically be assigned to Normal. You can modify the settings in the Normal button to change the font, spacing and indents if required. Paragraph indents If your house style requires you to use indents to indicate paragraphs, In the Normal Style, right-click and select Modify->Format->Paragraph to adjust indents. The preview box at the bottom of the dialogue box shows the results of your choice. Selecting First line indent results in the first line of every paragraph being indented. You can set how far the indent is by changing the number in the box under By. 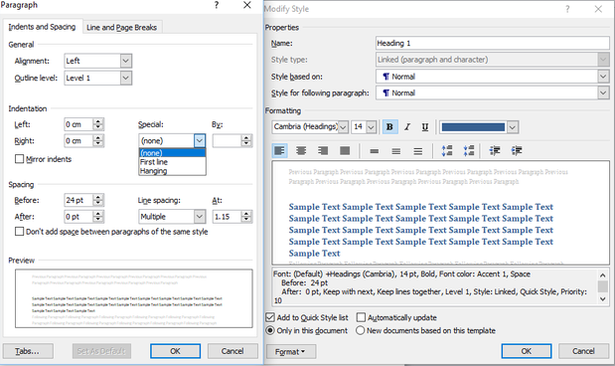 How to assign no indentation to the first paragraph only after a heading If your house style requires you not to indent the first line in the first paragraph of each chapter, but to indent the first line in all subsequent paragraphs, assign a different Style to the first paragraph than the rest of the body text. The easiest way is to create a new style for first paragraphs.
 Outline View In this view it is easy to check for the heading levels and consistency of capitalisation and wording of the headings in a quick overview. In the View tab along the top of your document, select Outline, then select how many levels of headings your document has from the Show Level drop-down box. 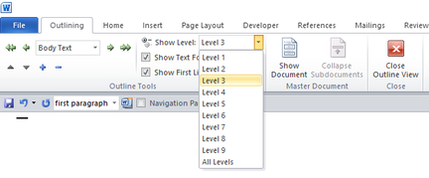 You should now see all the headings in their appropriate levels. 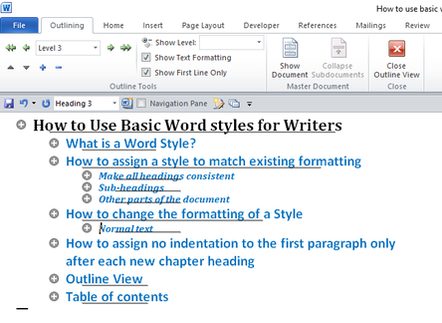 To go back to Print view, click on the red Close Outline View button.
How to insert a table of contents Once you have all the Styles assigned to the headings, you can make a table of contents with just a few clicks.
You have the choice whether to choose one of the automatic tables at the top of the drop-down box, or to select Insert Table of Contents to customise it. If you select an automatic table, it will only let you go down to a heading level 3. If you select Insert Table of Contents, you can customise how many levels are shown, the formatting, whether to show page numbers and where, and the tab lead style. Note: If you adjust any of the headings after inserting a table of contents, click Update Table on the References tab. What next? Got an unruly report that needs to be whipped into shape, or some untidy copy that needs some TLC? Get in touch today to enquire about my business editing and plain language services. Contact me today to discuss how I can help you achieve your goals with clear, professional writing. I would love to hear from you. Comments are closed.
|